BAS_MyEnroll Logo
Entering a New Health Care FSA Claim
Below you will find a step-by-step guide for filing a health care claim online.
Logging into MyEnroll.com

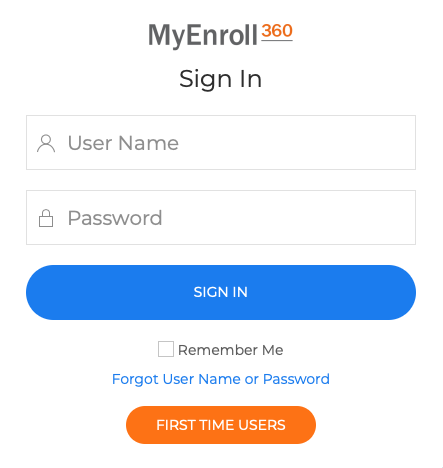
Visit www.MyEnroll.com using the Internet browser of your choice (Firefox, Chrome, etc.). Next, enter your User Name and Password, and click Sign In.
 
Note: If this is your first time logging into MyEnroll.com, you will be required to complete the security questions before accessing the system to manage your claims.

Forget your User Name and/or Password? Just click Forgot User Name or Password and follow the instructions provided to receive your login credentials. 
Screen Shot 2019-06-05 at 3.15.40 PM
Accessing the FSA Claims Online Entry System

After you have logged in, you will be directed to the Employee Profile Page.

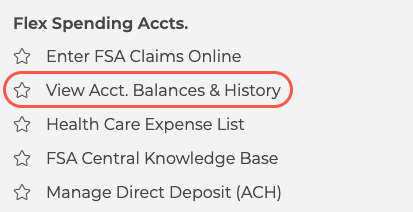
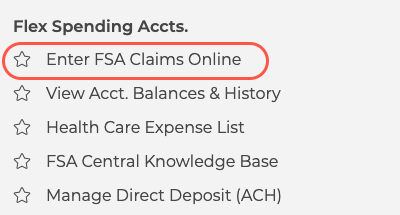
Using the menu, select Enter FSA Claims Online from the Flex Spending Accts. section.
Screen Shot 2019-06-05 at 3.20.30 PM
Entering a New Health Care Claim

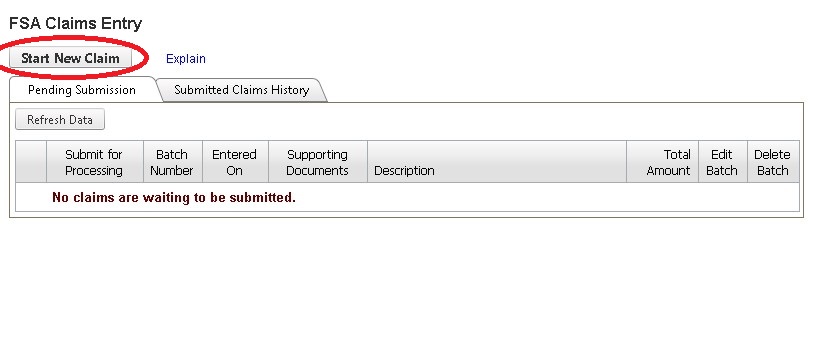
Click on the Start New Claim button to begin.

Note: On the FSA Claims Entry screen, you can also click on tabs to view claims that are pending submission as well as your submitted claims history.
start_new_claim
Adding a Health Expense to Your Claim

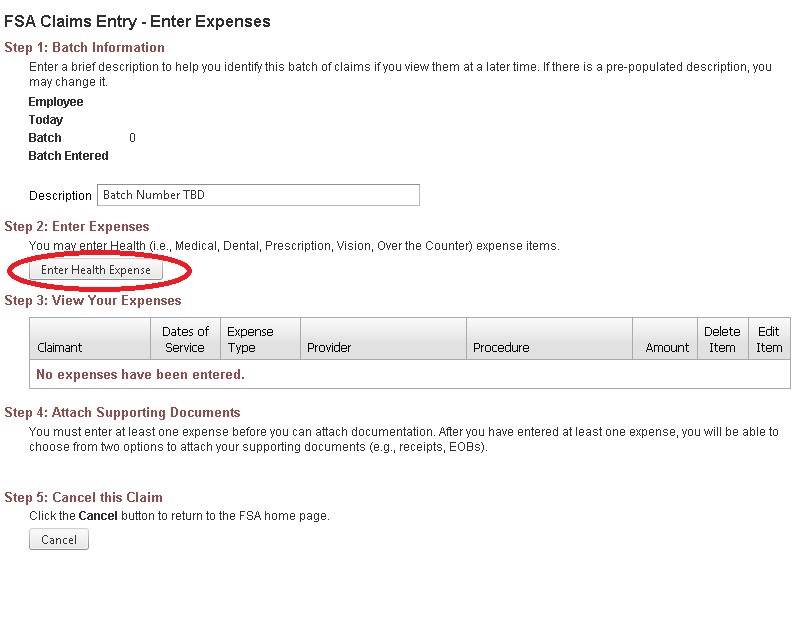
You will now see the FSA Claims Entry - Enter Expenses screen.

 Click on the Enter Health Expense button to begin adding individual expenses to your claim.
Adding_Health_Expense_to_Claim
Adding a Health Expense to Your Claim
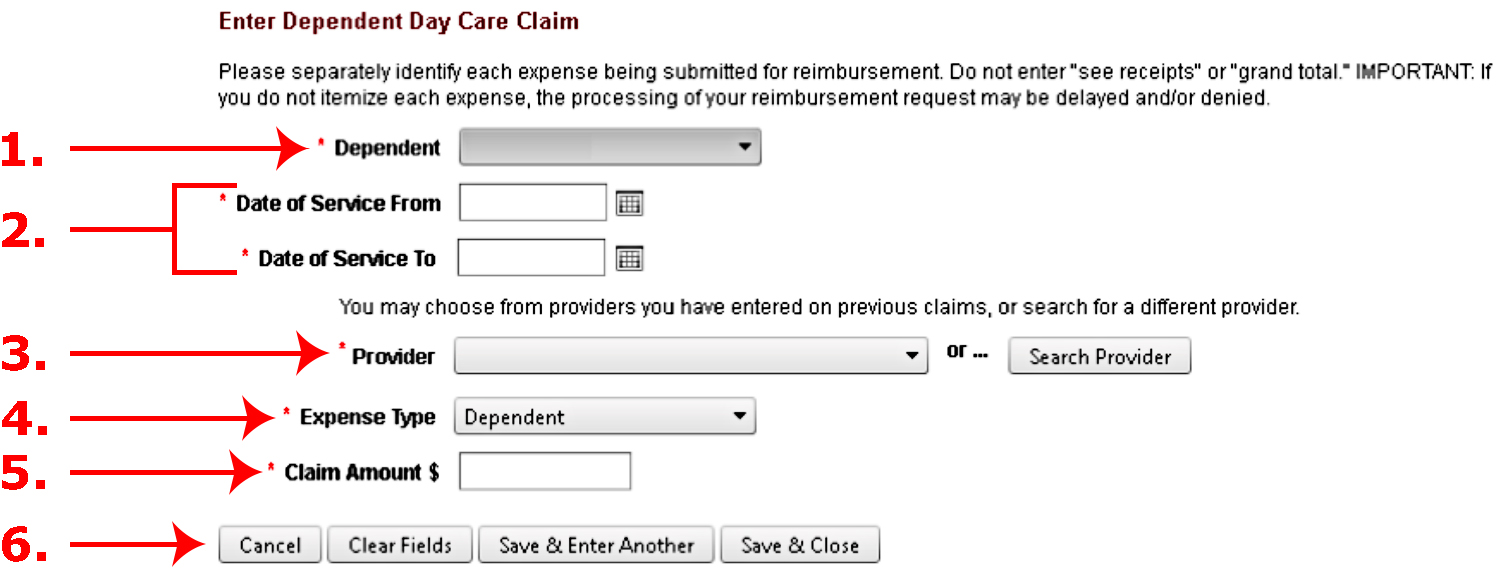
1. In the Self or Dependent field, select the claimant using the drop-down box. If the dependent is not listed in the drop-down box, click on the Add Dependent button.
2. Enter the Dates of Service. A calendar tool is available to help you accurately populate these fields.
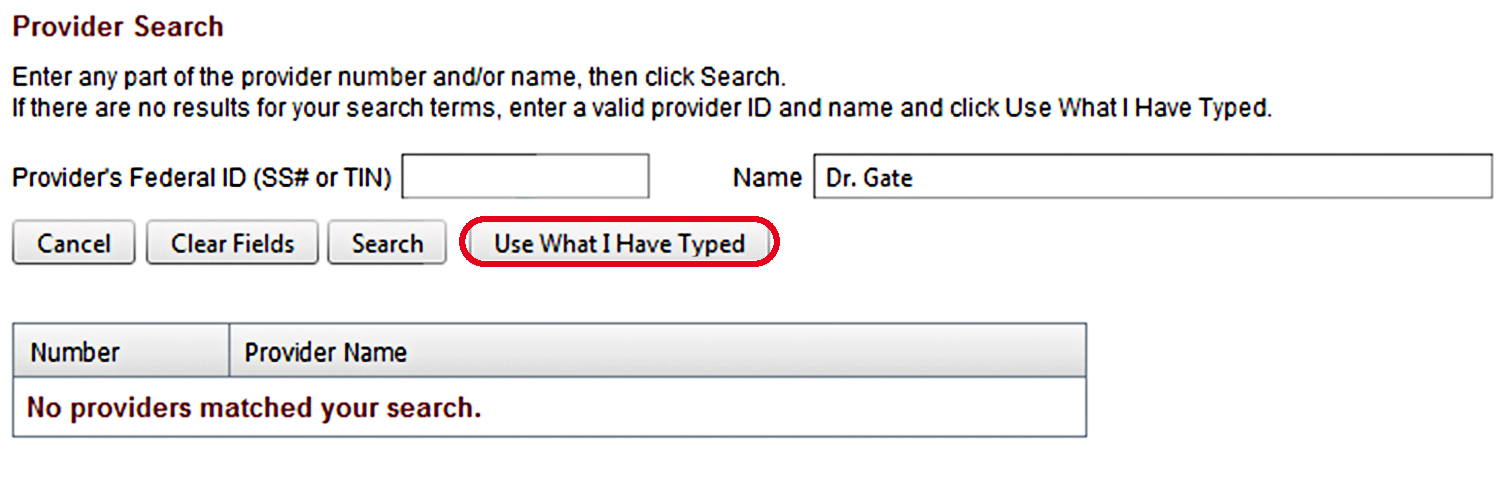
3. Using the drop-down box, select the provider associated with your expense. If the provider is not listed, you can also click on the Search Provider button to find your provider's name.
  • If you search for a provider that is listed in MyEnroll.com, the provider's name will appear in the results menu. Click on the name in the results menu to add the provider to your claim.
  • If you search for a provider that is not yet listed in MyEnroll.com, you will receive a “No Providers Matched your Search” message. You will need to type in the name of the provider and click on the Use what I have typed button.
4. Select the Expense Type by clicking Medical, Prescription, Vision, Dental, or Over the Counter.
  • When entering a prescription, you will be prompted to list the prescription number associated with each prescription receipt.
5. Next, using the drop-down box, choose the procedure associated with your expense. If the procedure is not listed, you can also click on the Search Procedure button.
  • You can either search by procedure code (as listed on your paperwork) or typing a description of the service.
  • If you search for a procedure that is listed in MyEnroll.com, the procedure name will appear in the results menu. Click on the procedure name in the results menu to add it to your claim.
  • If you search for a procedure that is not yet listed in MyEnroll.com, you will receive a "No Procedures Matched your Search" message. You will need to type a description of the procedure and click on the Use what I have typed button.
6. Enter the dollar value of the expense that you are claiming in the Claim Amount field.
7.
When you have entered all of the above information:
  • If you'd like to add additional expenses click on the Save & Enter Another button.
  • If you are finished, click on the Save & Close button. 
  • You can also clear all fields and start over by clicking on the Clear Fields button.
  • Or, click on the Cancel button to close the window and return to the previous screen. 
Helpful Tip: As you submit claims, the associated providers and procedures will be stored in the drop-down list to make future submissions even faster and more convenient.
Slide5
Slide6
Claims Entry Options
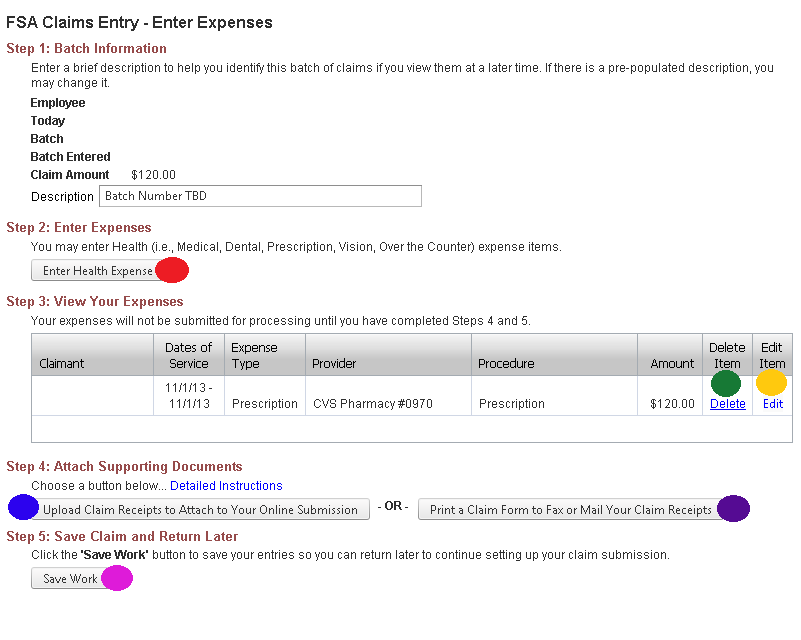
After providing your expense details, you will be directed back to the FSA Claims Entry - Enter Expenses page, where you can see your newly added claim. From this page, you can complete the following options:
 
A. Enter Health Expense
Click on this button if you forgot to list one of your expenses.
B. "Delete" Click on this link only if you want to remove the claim information.
C. "Edit" Click on this link to update the claim information.
D. Upload Claim Receipts to Attach to Your Online Submission
Click on this button to include receipts and other supporting documentation with your claim.
(See step below for instructions on uploading claim receipts.)
E. Print a Claim Form to Fax or Mail Your Claim Receipts Click on this button to print your claim form and attach receipts to the printed copy. This submission should be sent via fax or USPS mail. The fax number and mailing address is provided on the claim form that you can print.
F. Save Work Click on this button if you do not want to submit your claim right now but would like to save your claim for submitting later.

Note:
Depending on their benefit elections, some users can also enter Dependent Day Care claims from this screen. These users may do so before or after entering a Health Care claim by clicking on the Enter Dependent Day Care Expense button. For step-by-step instructions on entering a Dependent Day Care claim, please see here.
health_claims_options
Upload Claim Receipts and Supporting Documentation
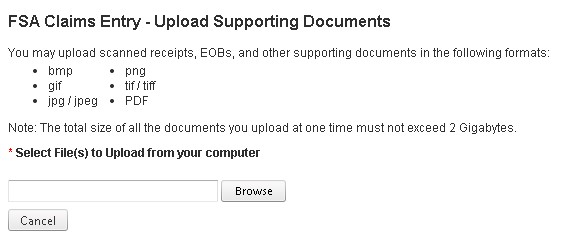
When you click on the Upload Claim Receipts to Attach to Your Online Submission button, you'll be directed to the FSA Claims Entry - Upload Supporting Documents screen. From here, you can attach scanned images of receipts, as well as other supporting documentation, for your eligible FSA expense. If you do not have a scanner, you can take clear pictures of your receipts with your cell phone, send them to yourself in an email, and then upload and save them to your computer to attach.
  • Click on the Browse button.
  • Select the file(s) for your FSA expense receipt or supporting document.
  • Click on the Open button to add item(s) to your list of files.
  • If you forget to select a receipt, repeat the above three steps for additional receipts and/or supporting documents.
  • Click on the Attach all Files to Claim button to upload your files to MyEnroll.com.
Note: Supporting documentation can include receipts, statements, documentation, Explanations of Benefits, prescriptions, and/or Letters of Medical Necessity showing that the eligible expense was incurred. To see the supporting documentation required for your claim, please review this guide.
Uploading_Supporting_Documentation
Submitting and Certifying Your Claim
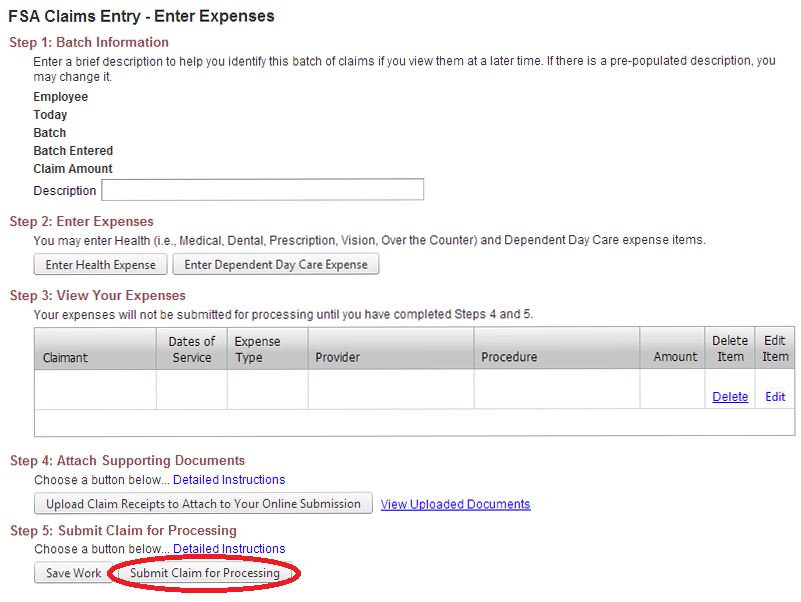
After you have attached all of your supporting documents, you will return to the FSA Claims Entry page. From here, you can submit your claim by clicking on the Submit Claims for Processing button at the bottom of the page.
 
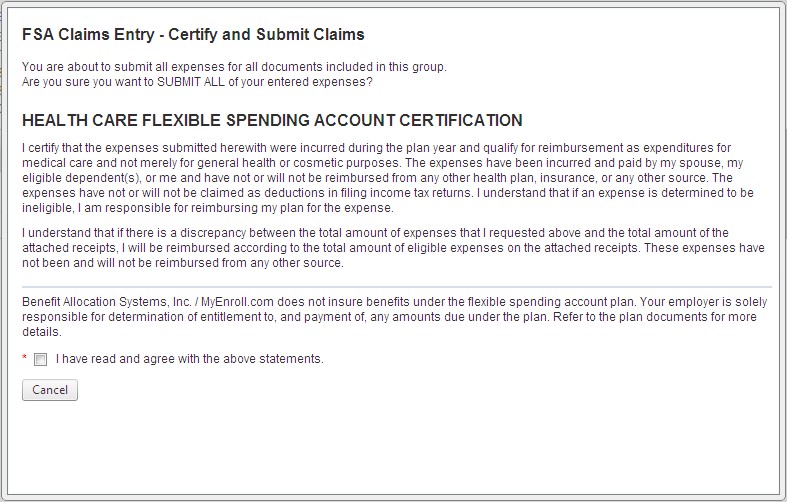
As soon as you click on the Submit Claim for Processing button to submit your claim, the FSA Claims Entry - Certify and Submit Claims notice will appear.
  • Read the notice and check the box at the bottom of the screen to certify your submission.
  • To finalize your submission, click on the Submit Claims button.
  • If you do not wish to submit your claim at this time, click on the Cancel button. You will go back to the FSA Claims Entry – Enter Expenses page.
submit_claim_for_processing
Submitting__Certifying_your_Claim

Congratulations you have just completed your Health Care Claim online!

To Look at your FSA Account History
You may log on to www.myenroll.com at any time to check the status of your FSA claims. After logging into MyEnroll, select FSA Claims from the Quick Links menu. Then select the Claims & EOB History tab. Each receipt processed will be listed along with the payment status of "paid" "denied" or "pending." To find out why a claim is denied, click on the Denied link.
Screen Shot 2019-06-05 at 3.22.49 PM
If you have questions about your Debit Card or your FSA program, please contact us at 1-800-945-5513 or Info@BASusa.com. Your questions and feedback are important to us.
Return to FSA Central
© 2025 Benefit Allocation Systems, LLC